Creating a Snow Teeth Whitening video is a fantastic way to showcase the product’s effectiveness and guide potential customers through the process. This comprehensive guide will walk you through every step, from understanding the product to editing and publishing your video, ensuring your content is engaging and informative. Get ready to produce a compelling Snow Teeth Whitening video that attracts viewers and promotes a brighter, healthier smile.
Understanding Snow Teeth Whitening
Before you start filming, it’s essential to understand what Snow Teeth Whitening is and how it works. This foundation will help you create a video that’s both accurate and persuasive, allowing you to inform and persuade your audience about the product and its capabilities. Make sure to properly address all aspects and benefits of the product to ensure your video engages viewers.
What is Snow Teeth Whitening
Snow Teeth Whitening is a popular at-home teeth whitening system designed to remove stains and brighten your smile. It typically includes a whitening serum, LED light technology, and mouth trays to ensure proper and even application. The product is formulated to be easy to use and deliver noticeable results, making it an attractive option for those seeking a brighter smile without professional dental treatments. The product has gained significant traction in the market due to its user-friendly approach.
How Snow Teeth Whitening Works

The Snow Teeth Whitening system works by combining a whitening serum with LED light technology. The serum contains active ingredients that penetrate the enamel, breaking down stains and discoloration. The LED light accelerates the whitening process, amplifying the serum’s effectiveness. Users apply the serum to their teeth, insert the mouth tray with the LED light, and follow the recommended treatment time. This combination promotes rapid and efficient whitening.
Why Choose Snow Teeth Whitening
Snow Teeth Whitening offers several advantages over other whitening methods. Firstly, it’s convenient and can be done at home, saving time and money compared to professional treatments. The product is known to be gentle on sensitive teeth, minimizing potential discomfort. Furthermore, Snow often provides visible results within a few treatments, with users seeing a noticeable difference in the brightness of their smile. This combination of effectiveness, convenience, and gentleness makes Snow a great choice.
Preparing for Your Snow Teeth Whitening Video
Proper preparation is critical for creating a high-quality video. This involves gathering all the necessary supplies, setting up your recording space, and ensuring optimal lighting conditions. Careful preparation ensures that your video looks professional, clearly demonstrates the whitening process, and keeps viewers engaged, providing a positive experience.
Gathering Your Supplies

Before filming, assemble all the essential items needed for your Snow Teeth Whitening video. You’ll need the Snow Teeth Whitening kit itself, which includes the whitening serum, LED light, and mouth tray. Also, have a mirror available to help with application, a timer to track treatment time, and any other items you want to showcase. Make sure everything is clean and ready to avoid any interruptions or issues during filming, making the process smooth.
Setting Up Your Recording Space
Choose a quiet, well-lit location for your video. A clean and uncluttered space will help viewers focus on your demonstration. Ideally, you’ll want a backdrop that is neutral or related to oral care. Ensure that your recording setup is stable; use a tripod to prevent shaky footage. Before you start, test your camera and microphone to ensure your video is clear, sharp, and professional.
Ensuring Good Lighting
Lighting is a crucial element for video quality. The goal is to illuminate your face evenly, avoid harsh shadows, and showcase the product clearly. Natural light from a window is often a great option if available. Consider using softbox lighting or ring lights to illuminate your face if natural light is not available. Make sure the lighting is bright enough to capture the whitening process without causing any glare on your teeth. Proper lighting enhances the overall appearance of your video.
Creating Your Snow Teeth Whitening Video

With your supplies and setup ready, it’s time to create your Snow Teeth Whitening video. This phase includes the step-by-step application, demonstrating the product’s use, and highlighting the results. Remember to speak clearly, demonstrate each step precisely, and showcase the difference that Snow can make. This approach allows you to make your video both practical and attractive.
Step-by-Step Guide to Whitening
Begin your video by explaining the steps of the teeth whitening process. Start by brushing your teeth, then demonstrate how to apply the Snow whitening serum to the mouth tray. Clearly show how to insert the tray into your mouth and turn on the LED light. Provide the recommended treatment time and demonstrate how to remove the tray and rinse your mouth. Be as precise as possible, and don’t forget to offer any additional tips for the best outcomes.
Demonstrating the Application
Show your audience how to use the Snow Teeth Whitening system. Illustrate how to apply the serum, insert the mouth tray, and activate the LED light. Show how long to leave the tray in your mouth. Show the process step by step so your audience can visualize the procedure. Your demo should show correct application of the product to make it easy for viewers to follow along, making sure they fully understand all steps.
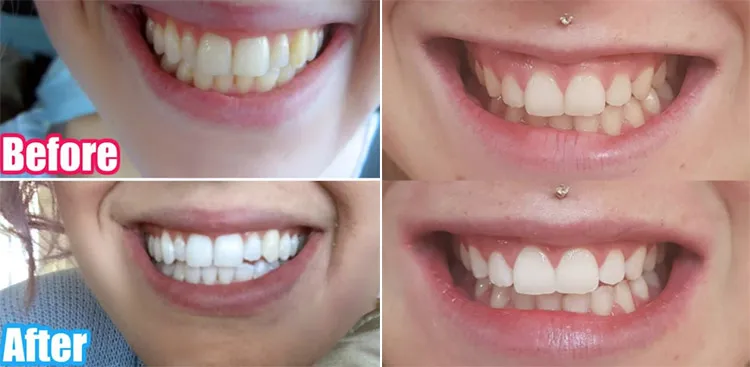
Highlighting Results

Showcase the results of the Snow Teeth Whitening treatment. Use ‘before and after’ comparisons to highlight the difference in tooth shade. These visual comparisons can be powerful in persuading viewers of the product’s effectiveness. You can also describe how your teeth feel after using the product, giving a personal touch to your video. This will add to your credibility as a reviewer and help others see the value of using the product.
Editing and Publishing Your Video
Once you’ve recorded your footage, it’s time to edit your video and prepare it for publishing. This phase involves selecting the right video editing software, incorporating music and text, and publishing your video on the platforms that are best for the target audience. The more attractive and informative your video, the more success you will have with the product.
Video Editing Software Options
There are many video editing software options available, ranging from free to professional-grade programs. Some popular choices include Adobe Premiere Pro, Final Cut Pro, iMovie, and DaVinci Resolve. The software choice depends on your budget, skill level, and the features you need. Basic editing, such as trimming and adding music, can often be done with free software. If you’re looking for more advanced features, consider investing in a professional program.
Adding Music and Text

Enhance your video by adding background music and text overlays. Choose music that complements the video’s mood and doesn’t distract from your main message. Use text to add annotations, highlight key points, or provide additional information. Keep the text clear and easy to read, and use it to emphasize the value of the product. Make sure your music choice fits your brand and target audience for maximum effectiveness.
Publishing to Different Platforms
Once your video is edited, the next step is publishing it on your chosen platforms. YouTube is a popular choice for video content. Instagram, TikTok, and Facebook are ideal for shorter, attention-grabbing content. When uploading, be sure to optimize your video with relevant titles, descriptions, and tags. Consider posting at times when your audience is most active to boost visibility. Sharing on many platforms increases visibility.
Promoting Your Snow Teeth Whitening Video
To get the most out of your Snow Teeth Whitening video, you need to promote it effectively. This includes implementing SEO best practices, using social media to reach a wider audience, and interacting with viewers. Increasing your video’s visibility will drive traffic and encourage potential customers. Ensure you promote your content to create awareness.
SEO Optimization for Your Video

Use SEO to enhance your video’s visibility. Optimize your video title, description, and tags with relevant keywords. When choosing a title, include words like ‘Snow Teeth Whitening,’ ‘How To,’ and ‘Review.’ Write a detailed description with a call to action. Use relevant tags to match what people are searching for, and optimize your video. Optimize for SEO to boost views.
Using Social Media
Share your video on your social media platforms, including Facebook, Instagram, and Twitter. Create engaging posts with a brief description of the video and a compelling call to action, asking people to watch. Use relevant hashtags to increase visibility. Try running paid ads to reach a broader audience. Promote your video on various social media sites to maximize traffic.
Engaging with Your Audience
Respond to comments and questions. Be sure to show that you appreciate viewers’ questions and feedback. Ask them to share their experiences and offer assistance. This type of active engagement helps build community and trust. By interacting with your viewers, you can create a community around your video and build your brand. Be sure to keep the conversation positive.
Creating a Snow Teeth Whitening video is a rewarding experience that can help you showcase a product and connect with others. Follow the steps outlined in this guide to produce a high-quality video that not only informs but also engages and inspires your audience. By following these steps, you’re on your way to building a community and promoting a product through a helpful video!